How to Remove Rust From Wrought Iron Gates and Garden Furniture (Without Damaging the Metal)
Learn how to safely remove rust from wrought iron gates and garden furniture using effective cleaning methods that protect the metal and prevent future corrosion.

An iron gate rarely fails because the iron was bad. It fails because someone painted over the rust. Here is where rust actually starts on exterior ironwork, four ways to remove it, and the one step most people skip that decides whether it comes back next spring.
Why rust comes back
Rust is not a surface stain. It is a chemical reaction that produces a material with roughly seven times the volume of the steel it consumed. That expansion is why the process accelerates: iron oxide lifts the paint film from underneath, the crack lets in water, the water feeds more corrosion, and the paint lets go in sheets.
This is also why painting over rust never works. You are not sealing the metal, you are trapping a reaction under a flexible skin that the reaction will push off within a season or two.
On exterior ironwork, the corrosion almost always starts in the same five places:
Welds and the heat-affected zone beside them. Welding burns off any coating and leaves a slightly different microstructure. Paint adheres less well there, and moisture sits in the crevice where the weld bead meets the parent metal.
The bottom rail. Water runs down and stops there. On gates and railings with hollow sections, the inside of that rail can be a reservoir with no drainage.
Fixings and joints. Where stainless screws meet mild steel, or where two painted surfaces are clamped together, you get a crevice that never dries.
Horizontal surfaces and open finial tops. Any upward-facing ledge holds water and grit.
Edges, chips and scratches. A chip smaller than a fingernail is enough. Corrosion creeps sideways under intact paint far faster than it moves through it, so by the time you see a blister, the pit underneath is usually wider than the blister.
Test before you plan. Push a screwdriver tip into the suspect area. If it sinks, the section has thinned and no coating will fix it — that piece needs cutting out and replacing. If it only flexes paint and crumbles light scale, the metal is sound and cleaning is worth doing.
First, identify what you are actually cleaning
“Wrought iron” is used loosely. Most gates and garden furniture sold in the last fifty years are fabricated from mild steel, not true wrought iron, and the two behave differently under abrasion. Before choosing a method:
Mild steel — the normal case. Takes abrasion well, rusts readily, needs a full coating system.
Cast iron — bench ends, urns, table bases. Thick and corrosion-resistant in the body but brittle. Do not hit it with a chipping hammer, and do not let anyone blast it at high pressure.
Galvanised steel — the dull grey mottled finish is a zinc coating that protects the steel sacrificially. Grinding it off removes the protection and creates a hard-to-coat surface. Clean it gently, and accept the grey.
Aluminium — cast garden furniture that looks like iron often is not. It does not rust; it forms white powder and pits. Different problem, different fix.
One warning that overrides everything else in this article: if the piece might carry lead paint, test it before you abrade, blast, or burn anything. Lead paint was normal on exterior ironwork well into the 1970s. A cheap swab test takes ten minutes. Blasting or heating lead paint produces dust and fume you do not want in a garden your children use.
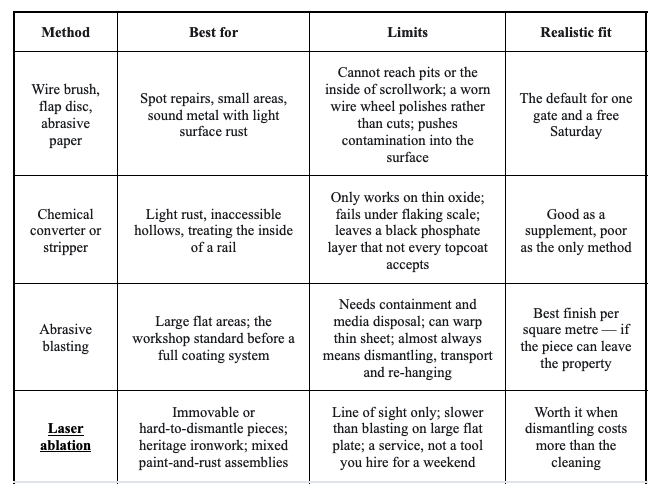
Four ways to remove rust, compared honestly
Hand and abrasive tools
A wire cup brush on an angle grinder removes loose scale quickly, but it is a blunt instrument. It cannot get into a pit, and on ornate scrollwork it simply cannot reach the inside of the curves where the rust usually starts. Abrasive paper and flap discs cut better than a wire wheel because they remove metal rather than smear it, and they leave a scratch pattern that primer can key into — which matters more than most people realise.
The real limit is contamination. Wax, silicone polish, and old oil get pushed into the surface by a wire brush and will cause the new paint to crawl or lift. Wipe down with a proper solvent before and after mechanical cleaning, and give the metal a final degrease even if it looks clean.
Chemical converters
A rust converter is usually phosphoric or tannic acid. It reacts with iron oxide to form a stable black layer that can be painted over — the idea being that you convert rather than remove. Used within its limits, it works: on light, uniform surface rust, and on the inside of hollow sections you can never reach by hand, it is genuinely useful.
It fails in two predictable ways. On heavy, flaking scale, the acid cannot penetrate to sound metal, so you seal a layer of loose oxide under a black skin. And on pieces where you want the look of bare metal — a waxed or oiled finish rather than paint — a converter is the wrong product entirely, because it leaves a colour you cannot undo.
Abrasive blasting
Blasting is still the reference standard before a full coating system because it produces a uniform, profiled, chemically clean surface in one pass. On large flat areas nothing else is as fast per square metre.
What people underestimate is the logistics. Blasting is a workshop job: the gate comes off its hinges, goes on a trailer, gets cleaned, comes back, gets re-hung. On a gate set into stone piers, or a railing fixed to a rendered wall, that sequence can cost more than the blasting itself. Thin decorative sheet also warps under heat and pressure, and blast media has to be contained and disposed of — which is awkward in a courtyard, on gravel, or over planted beds.
Laser ablation
This is the method most homeowners have never seen, and it works differently from the other three. A pulsed fiber laser delivers short bursts of energy that ablate the oxide layer rather than grinding or dissolving it. There is no media, no water, no chemical waste, and nothing to sweep up afterwards.
Two properties make it useful on ironwork specifically. The first is selectivity: because paint, rust, mill scale and base metal absorb the beam differently, an operator can stop at the substrate, strip paint while leaving the mill scale, or clean a weld without touching the paint either side of it. Mechanical methods cannot do that — a wire brush does not know where the weld ends.
The second is that it can be done in place. No dismantling, no transport, no re-hanging. For a gate hung in masonry, a balcony railing three storeys up, or a piece of heritage ironwork you would rather not unbolt, that single fact often decides the choice. Modern laser cleaning units are also portable enough to be brought to the piece rather than the other way round.
It is not a universal answer. The beam needs line of sight, so the back of a closed scroll or the inside of a box section is out of reach. Deep pitting is cleaned but not filled — the pit remains, and if the section has thinned structurally, cleaning it just makes that visible. And on large flat panels, blasting is still faster per square metre.
When laser is worth the cost — and when it isn't
Laser cleaning is quoted by the hour with a mobilisation charge, so the arithmetic is not “cost per square metre” but “cost of cleaning versus cost of getting the piece to a workshop”.
It usually makes sense when:
The piece cannot practically be removed — set in masonry, welded to structure, or too large to transport.
Dismantling would damage surrounding stone, render, tiles or planting.
It is heritage or listed ironwork where loss of original surface is unacceptable, and where an abrasive would round off detail.
The assembly mixes materials — painted panels, galvanised sections, bare welds — and you want to keep some coatings and remove others.
Blasting containment is impossible: gravel courtyards, roof terraces, beds directly below.
It rarely makes sense when:
The piece lifts off its hinges and fits in a van. A converter, a brush and an afternoon will do.
It is a large flat run of railing with no detail to protect — blasting is quicker and cheaper.
The metal is perforated. Clean it and you still have to replace it.
The decision rule: if the cost of removing, transporting and re-hanging the piece is more than the cleaning itself, an in-place method wins. That is the whole argument for laser on exterior ironwork, and it has nothing to do with the technology being newer.
The step everyone skips: what happens in the next 24 hours
Cleaning is the visible half of the job. The invisible half is what you do in the hours afterwards, and it is where most rust returns from.
Bare steel is chemically active. In humid air it begins to oxidise within hours — the faint orange bloom called flash rust. Once that film forms, you are painting over oxide again, and the whole exercise starts over. So:
Coat the same day. Not the next weekend. If the weather is damp or coastal, plan for hours, not days.
Match the primer to the exposure. A zinc-rich primer or an epoxy mastic for anything structural or coastal; micaceous iron oxide builds good film thickness on decorative work. Do not put a water-based acrylic straight onto bare steel and expect it to hold.
Stripe coat the welds and edges. These are where film thickness is always lowest and corrosion always starts. Brushing a first coat into welds, edges and bolt heads before the main coat is the single cheapest durability gain available.
Two coats minimum, with proper cure between them. Dry to touch is not cured. Read the recoat window on the tin, and stay inside it.
Protect the insides. Hollow rails and box sections cannot be painted. Either drain and seal them properly, or treat the interior with a converter or a cavity wax.
If flash rust appears before you coat, re-clean it. Do not paint over it and hope. It takes five minutes and saves a season.
DIY, or call someone?
A rough split that holds up in practice:
Do it yourself if the piece is under about two square metres, you can lift it or work on it comfortably where it stands, the rust is surface-level with no perforation, you can work outdoors with eye and respiratory protection, and the piece is replaceable if it goes wrong.
Bring someone in if the paint may contain lead, the metal is already perforated or structurally thin, the piece is immovable, it is heritage or listed, the area is large enough that hand tools would take days, or you intend to claim a warranty on the coating system — most coating warranties assume a specified surface preparation standard that hand tools cannot reach.
A routine that keeps it away
Ironwork does not need much, but it needs it every year, in the right season:
Early spring: walk the boundary and probe the welds, bottom rails and fixings. Touch in any chip immediately — a chip repaired in April is a chip; a chip ignored until August is a pit.
Early summer: clean out the traps. Leaf litter and grit sitting in a bottom rail hold moisture against the steel all winter.
Autumn: check drainage and fixings before the wet season, and re-coat any horizontal ledge or finial top where film has thinned.
After any coastal season or road-salt winter: wash the ironwork down with fresh water. Salt is the single biggest accelerant on gates near the sea or a treated road.
An iron gate that is cleaned to sound metal and coated the same day will outlast the person who painted it. One that is painted over rust will need doing again in two years — and each cycle takes metal off the piece that you never get back.
Stay up to date with our latest ideas!